How to Start a Food Blog with WordPress
Table of Contents
- Discover Your Niche and Compete Effectively in the Food Blogging Landscape
- Crafting a Striking Blog Identity
- Strategizing Your Content Approach
- Begin Your Food Blogging Journey with a Domain Name and Hosting
- Setting Up Web Hosting for Your Food Blog
- Step-by-Step Guide for WordPress Installation on Bluehost
- Elevate Your WordPress Experience with Plugins
- Essential Plugins to Elevate Your Food Blog
- Creating and Managing WordPress Blog Posts
- Boosting Your Food Blog
- Monetizing Your Culinary Platform
- Ensuring Blog Stability Backups and Security Essentials
- Evaluating Your Food Blog's Effectiveness
- Success Stories Real-Life Food Bloggers and Their Earnings
Get ready to dive into the world of food blogging, where sharing your favorite recipes and culinary adventures is as easy as pie! Have you ever thought about starting your own food blog? Well, now's the perfect time, and we're here to guide you through the entire process. In a big online world with lots of blogs (over 230 million, to be exact!), many of them are all about food. Whether you're a chef, own a restaurant, or just love cooking at home, this step-by-step guide is perfect for you.
Starting a food blog is not just about sharing recipes; it's a chance to connect with people who love food just like you do. We'll show you how to use WordPress.com , a super simple platform, to create your own unique space online. So, if you're excited about sharing your culinary creations and maybe even making your food passion a bit of a side hustle, let's get started on this tasty journey together!
Discover the ins and outs of starting your very own food blog with our comprehensive guide.
Discover Your Niche and Compete Effectively in the Food Blogging Landscape
Defining your niche is not just a trend; it's the essence of your food blog, setting the tone for your content. It acts as a guiding force, signaling your passion and the blog's unique identity. To uncover potential success paths, delve into competitor research, akin to perusing a menu before ordering.
Conduct a web search to identify top performers in your niche and glean insights. Scrutinize social media to discover influential blogs and the content they share. Seek input from friends and family about their preferred food blogs.
Compile your findings in a document, noting successful elements such as post types, design, advertising strategies, and team structure. This exercise is about inspiration and ideas, laying the groundwork for your distinctive culinary journey.
Crafting a Striking Blog Identity
Your blog's name is its initial introduction in the competitive realm of food blogging. Focus on formulating a name that is memorable, alluring, and mirrors your distinctive style.
Kickstart the process with a brainstorming session, noting down words and concepts aligned with your vision. Utilize online tools like WordPress.com 's Business Name Generator for inspiration. Understanding your audience is pivotal for success; identify your target audience based on their experience level—whether beginners or food experts—to tailor content accordingly.
Strategizing Your Content Approach
Developing a well-defined content strategy is crucial for your food blog's triumph. Consider the variety of content you want to offer, such as recipe posts, reviews, how-to cooking guides, and engaging anecdotes.
Create a content calendar for consistency in publishing, ensuring your blog remains dynamic and engaging. Elevate the content experience with high-quality images, recipe cards, and nutritional information to enthrall and assist your readers effectively.
Begin Your Food Blogging Journey with a Domain Name and Hosting
Embark on the exciting path of food blogging by first securing a distinct domain name and reliable WordPress hosting. Your blog's online identity starts with the domain, so opt for a memorable .com extension. Make it short, catchy, and consider incorporating keywords for added relevance.
Start by understanding the importance of a domain name. It's not just an address; it's the identity of your blog. Choose a name that aligns with your content, making it easy for visitors to remember and return. Utilize reputable domain registrars such as Google Domains to swiftly check and secure your chosen domain.
When crafting your domain, keep your niche in mind. Let it provide a glimpse of your blog's content, and ensure it's concise for easy recall. Avoid hyphens and numbers for clarity, and prioritize uniqueness to stand out. Always check for availability before getting too attached to a name, and act promptly to secure your chosen domain. Your blog's digital journey begins here, shaping its identity and online presence.
Setting Up Web Hosting for Your Food Blog
Establishing robust web hosting is vital for the online presence and accessibility of your food blog. Web hosting services allow you to publish your blog on the internet, reaching audiences globally. Various hosting options, including shared, dedicated, and VPS hosting, offer distinct features. The choice depends on your specific needs and requirements.
Consider reputable hosting providers such as Cloudways , Hostinger , Kinsta , GreenGeeks, and SiteGround , each presenting different plans to meet diverse needs.
When selecting a domain name for your food blog, prioritize creativity, ensuring it is short, memorable, and reflective of your niche. Tools like Wordoid can assist in generating unique options. Popular domain extensions include .com, .org, .net, .co, and .us.
Setup using Bluehost
This guide emphasizes using Bluehost for hosting, a preferred choice for its free domain registration in the first year, easy WordPress software installation, free SSL certificate, reliability hosting over 2 million websites, 24/7 customer support, and a 30-day refund policy. Ensure your food blog has a reliable home on the web, making it accessible to your audience.
There are numerous hosting providers available, but we particularly favor Bluehost among the cost-effective, shared-server options. While it's officially recommended by WordPress, our preference for Bluehost stems from its optimal combination of affordability, robust features, and outstanding customer service. Setting up your Bluehost account is a straightforward process, and we've outlined step-by-step guidelines for your convenience.
-
Sign up with Bluehost: Begin by visiting Bluehost's homepage, where you'll find discounted rates through the provided link. Click the "Sign Up Now" button to initiate the process.

-
Choose a hosting plan: Bluehost offers three levels of shared hosting with variations in storage space, email accounts, and speed. For most businesses, the Plus package is recommended, but you can choose the one that aligns with your needs.

-
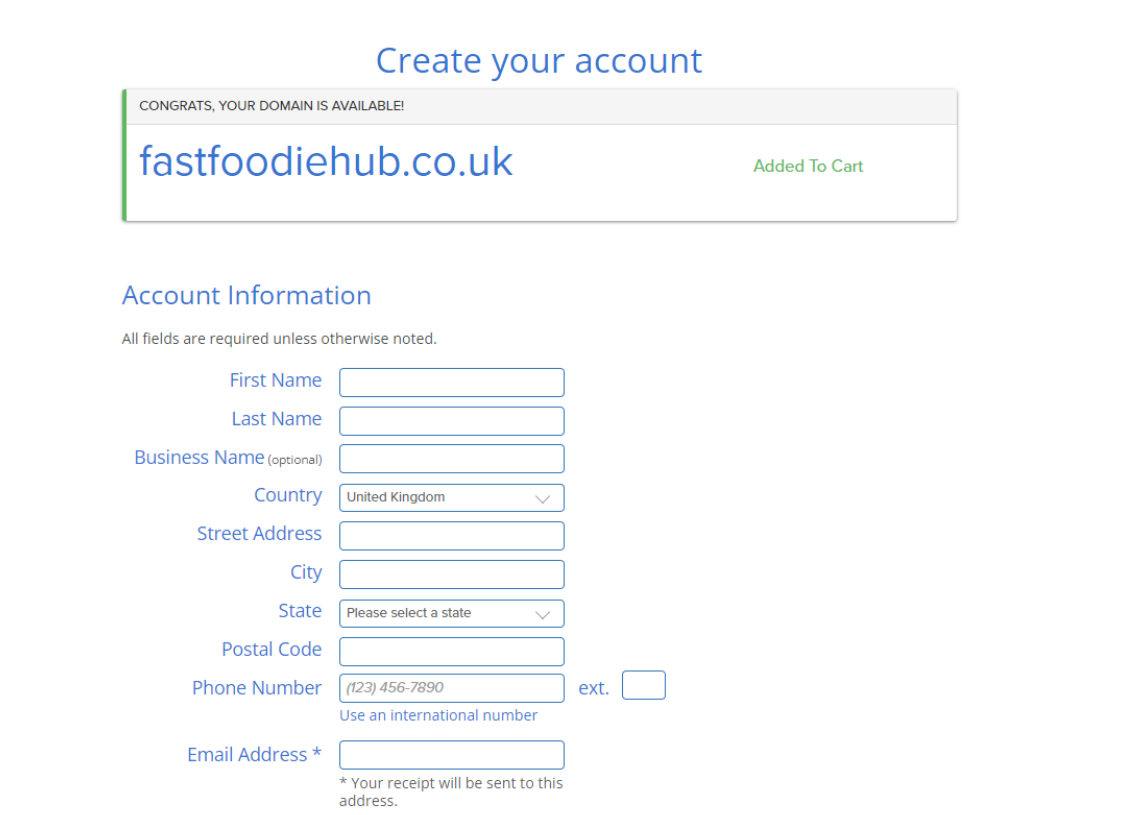
Choose/assign a domain name (URL): Select or assign a domain name for your site. You can purchase a domain during the sign-up, and it comes free with your new WordPress hosting account.

-
Enter your personal information: Fill in your personal information on the following page after choosing a domain name.
-
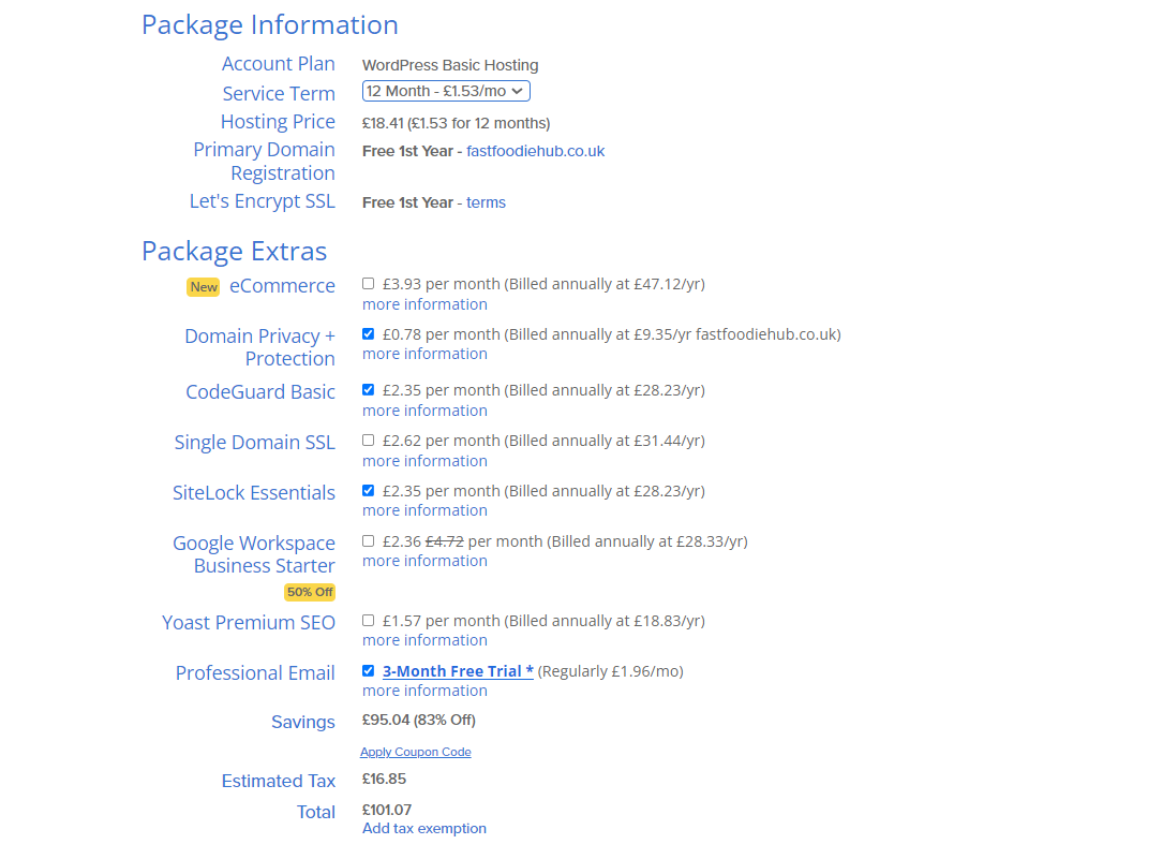
Choose the hosting duration: Opt for the hosting package duration, with options ranging from 12 to 36 months. The longer the term, the lower the monthly rate. We suggest the 36-month option to lock in introductory rates.
-
Additional options: Consider additional offers presented during sign-up, such as Domain Privacy, which keeps personal information private on WHOIS databases.

-
Create a password and get started: Click "Next" after selecting your hosting package, and then create a secure password for your account. Ensure it includes both uppercase and lowercase letters, a number, and a special character.

Following these steps, your hosting setup with Bluehost is now complete!
Step-by-Step Guide for WordPress Installation on Bluehost
Installation Steps:
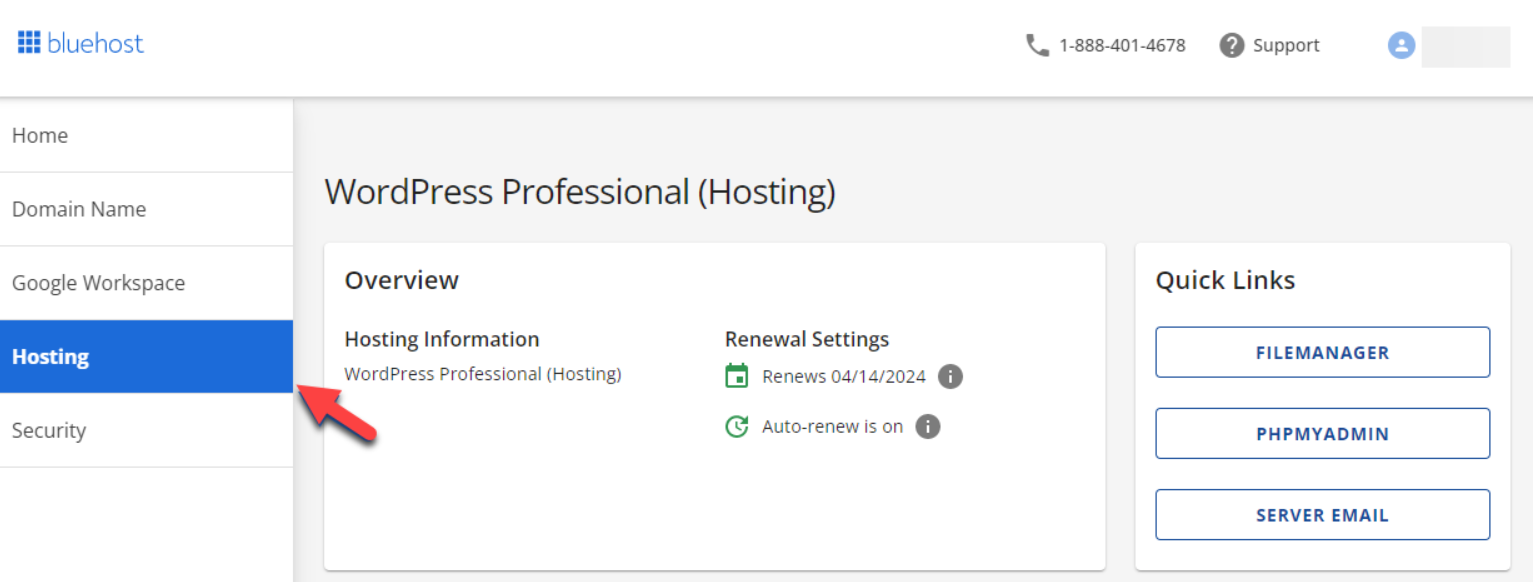
- Log in to your Bluehost.com control panel through the Account Manager.
-
Navigate to the Hosting tab in the side navigation menu.
-
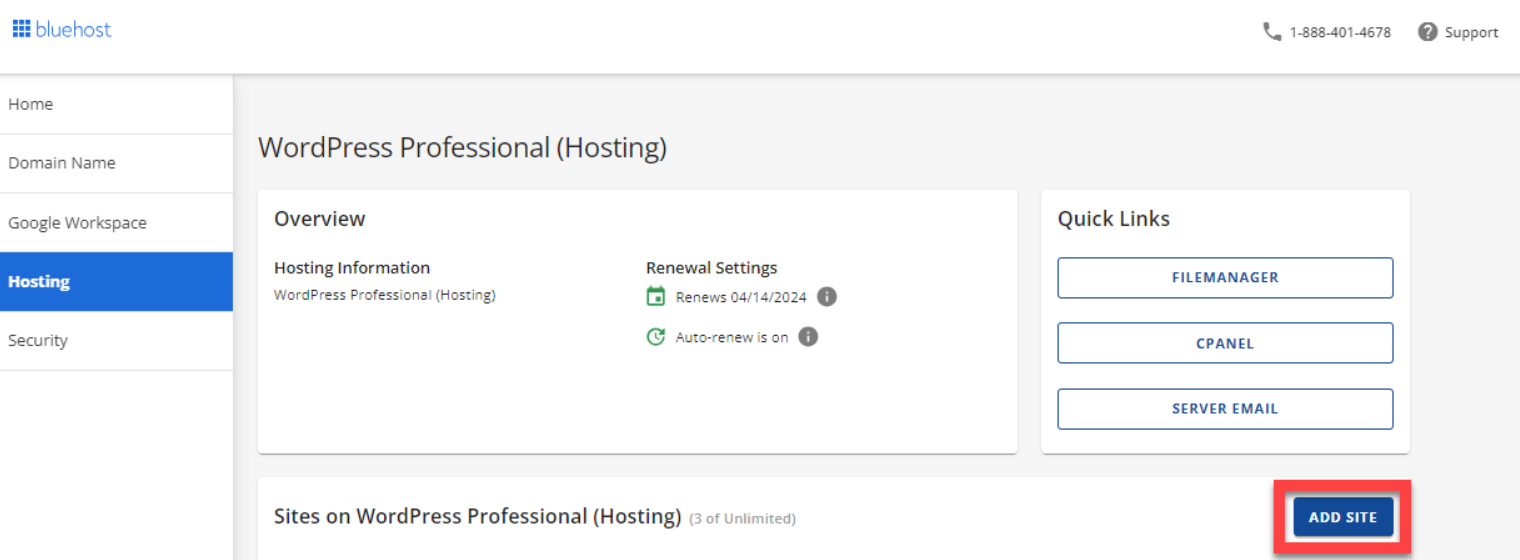
Click Add Site in the hosting interface.
-
Choose Install WordPress and proceed by clicking Continue.
-
The WordPress installation process will commence.

-
Click Log into WordPress once the installation is complete to access your WordPress dashboard.
Purchasing a New Theme
-
Access WordPress Dashboard: Upon logging in, locate the left-side main menu in your WordPress Dashboard and click on "Appearance."

-
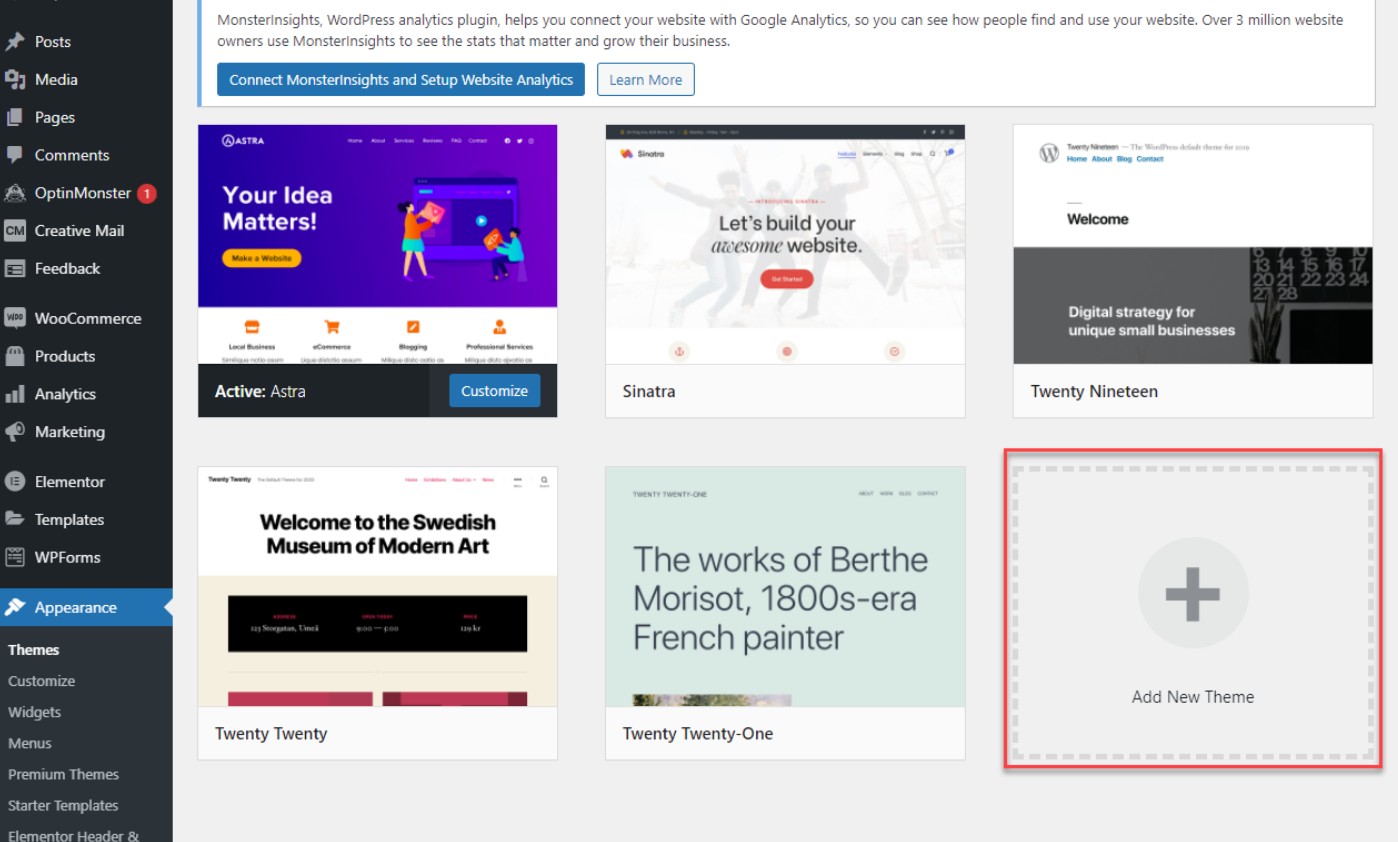
Navigate to Theme Options: Within the Appearance section, choose "Add New" to explore new theme options. This option is typically located at the bottom of your existing themes.
-
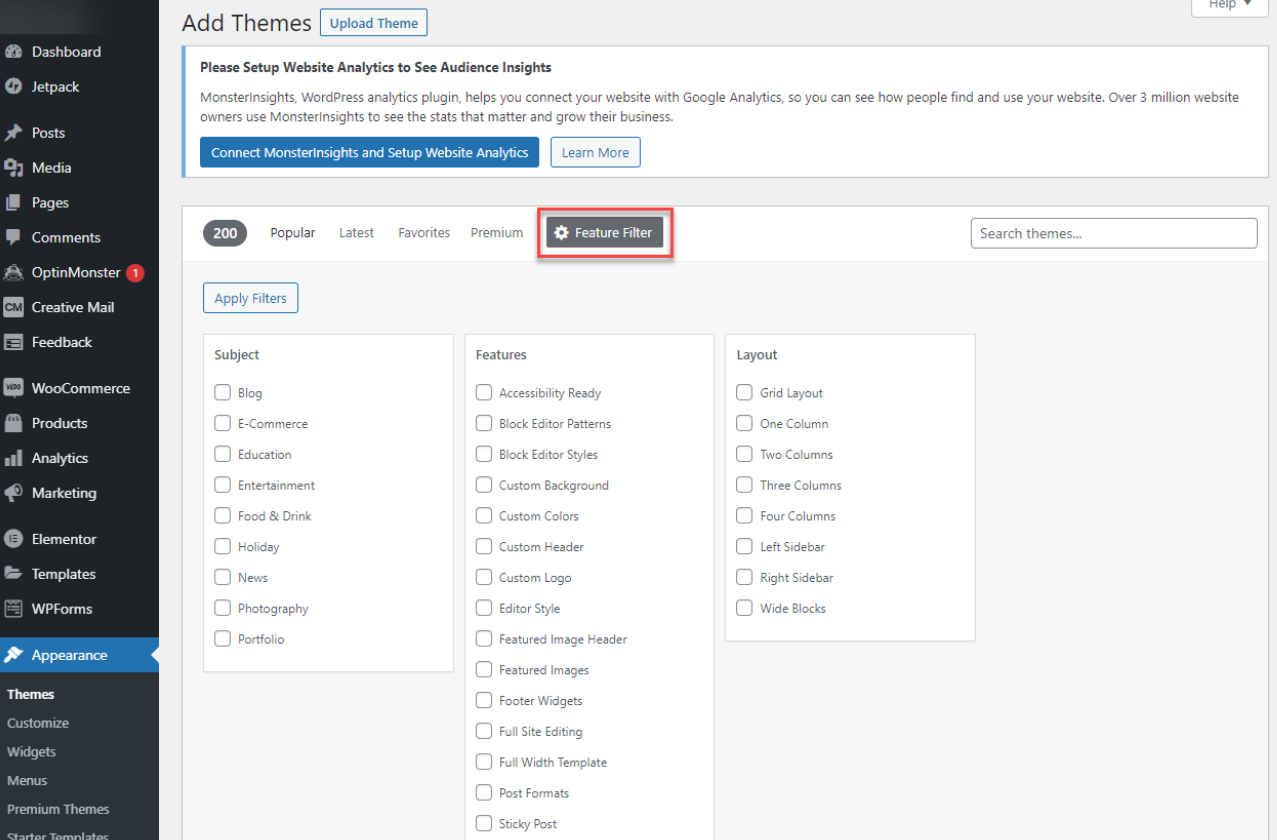
Explore Theme Choices: To discover a new theme, use the Feature Filter. You can refine your search based on color scheme, layout, features, and more. Ensure to click "Apply Filters" after adjusting your preferences.
-
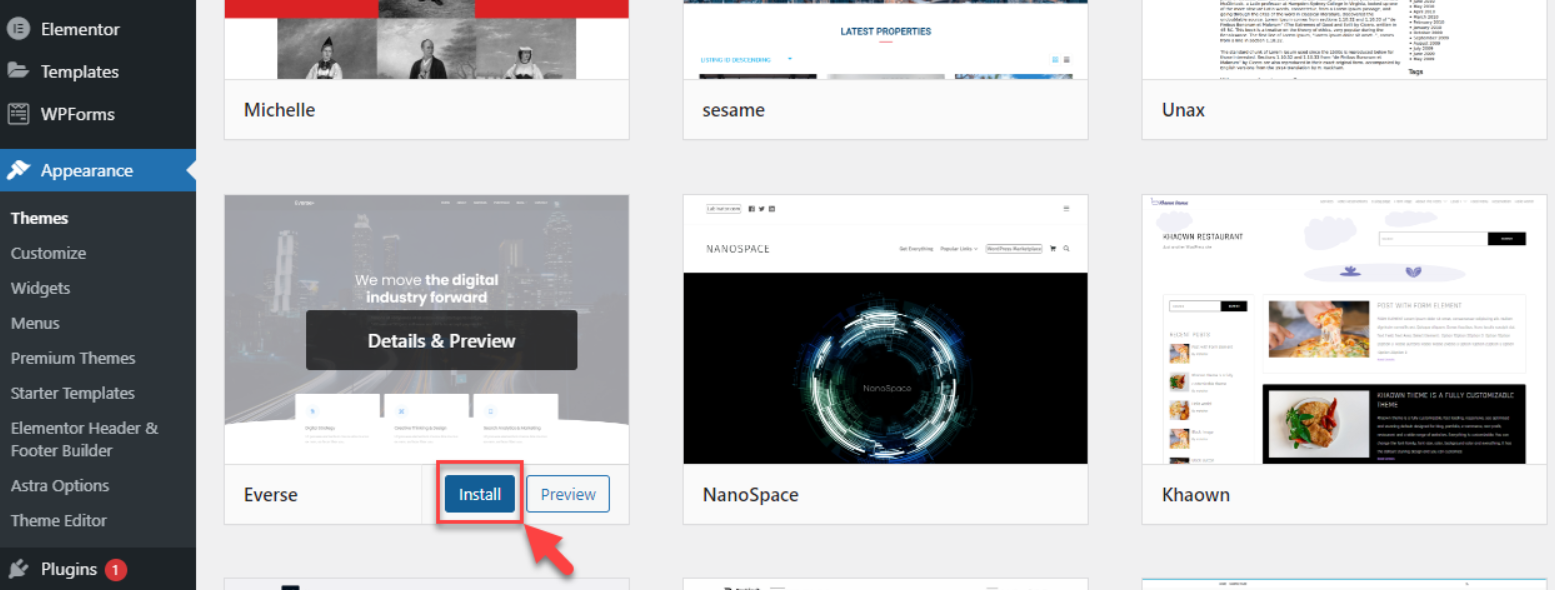
Install Selected Theme: Once you find a theme that suits your liking, click the "Install" button that becomes visible when hovering over the theme.
-
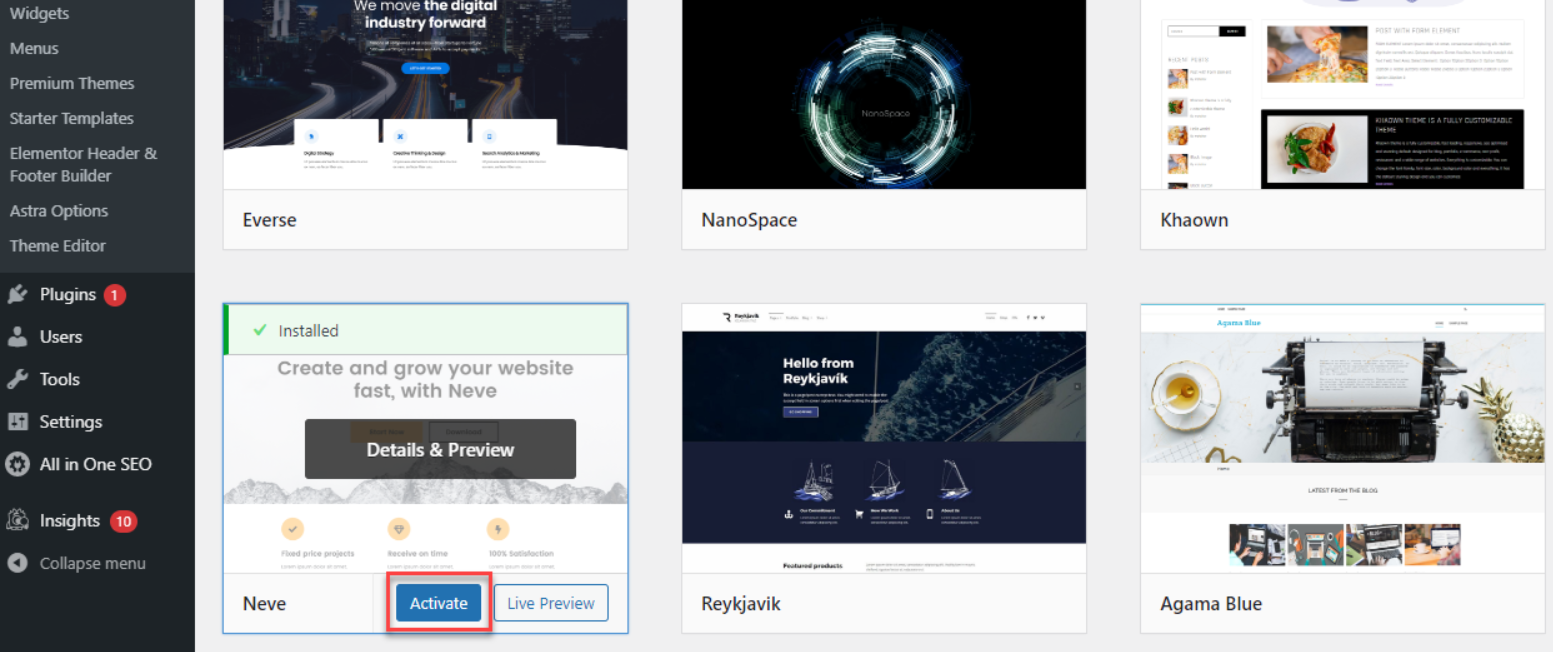
Activate the Installed Theme: After successful installation, activate the theme by clicking the "Activate" button. This will immediately apply the new theme to your site.
Elevate Your WordPress Experience with Plugins
A plugin is software that adds features to your WordPress site without coding. Now, let's explore how to install and select plugins:
-
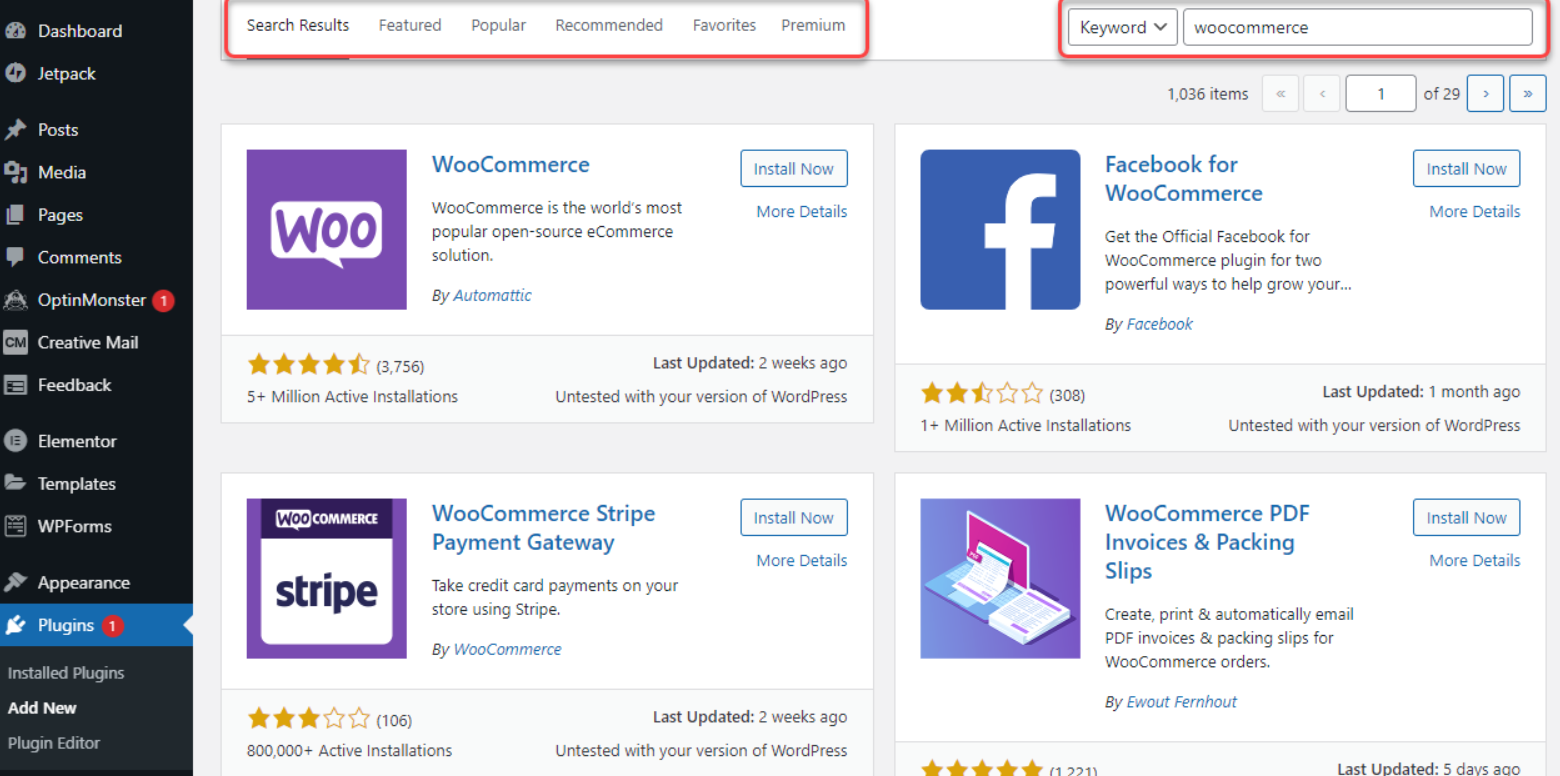
In your WordPress Dashboard, navigate to the Plugins menu and select "Add New."

-
Use the Keyword field to find a plugin based on name, category, or function.
-
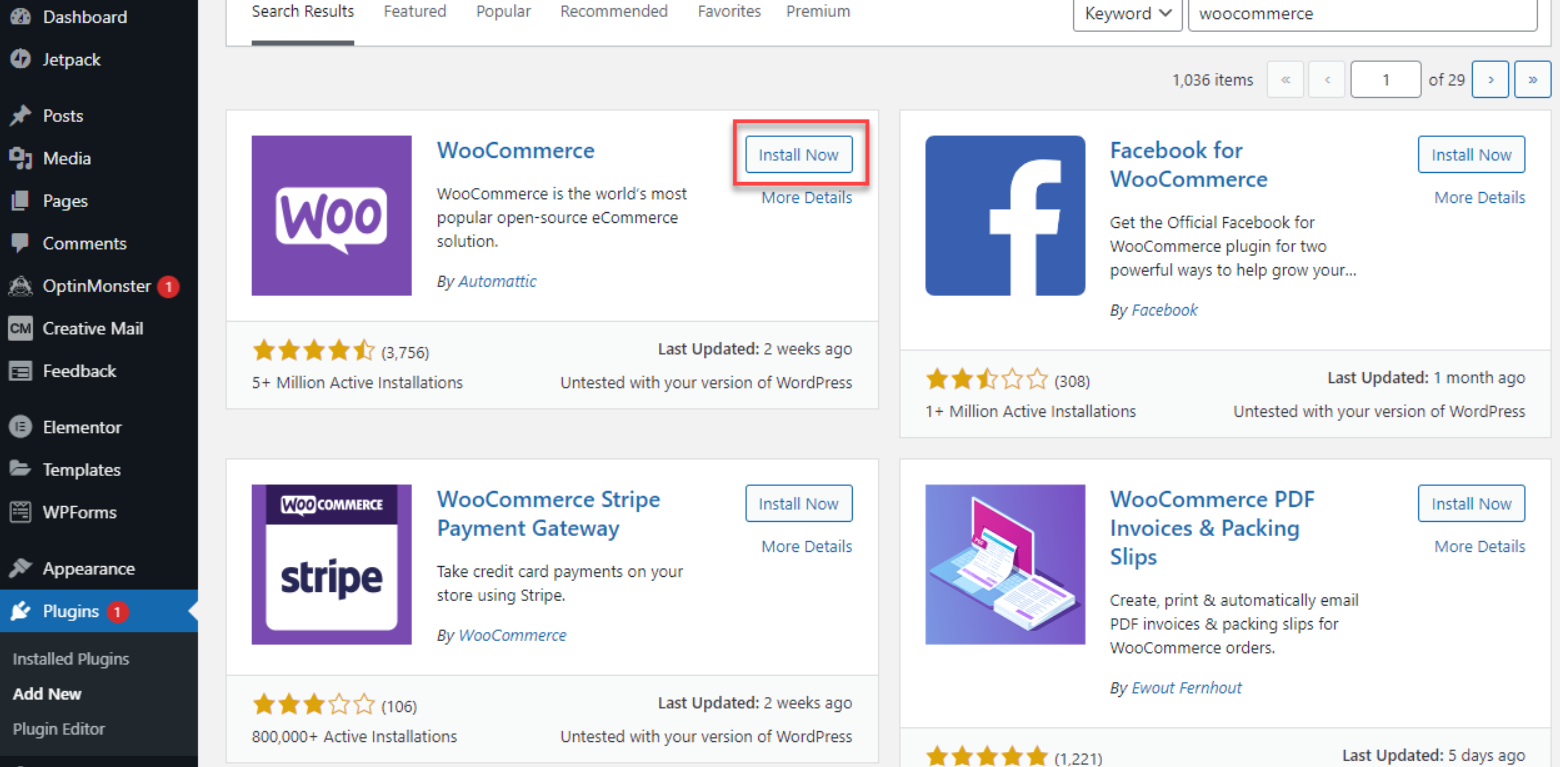
Click "Install Now" next to your chosen plugin.
-
Activate the installed plugin to integrate it into your WordPress blog.
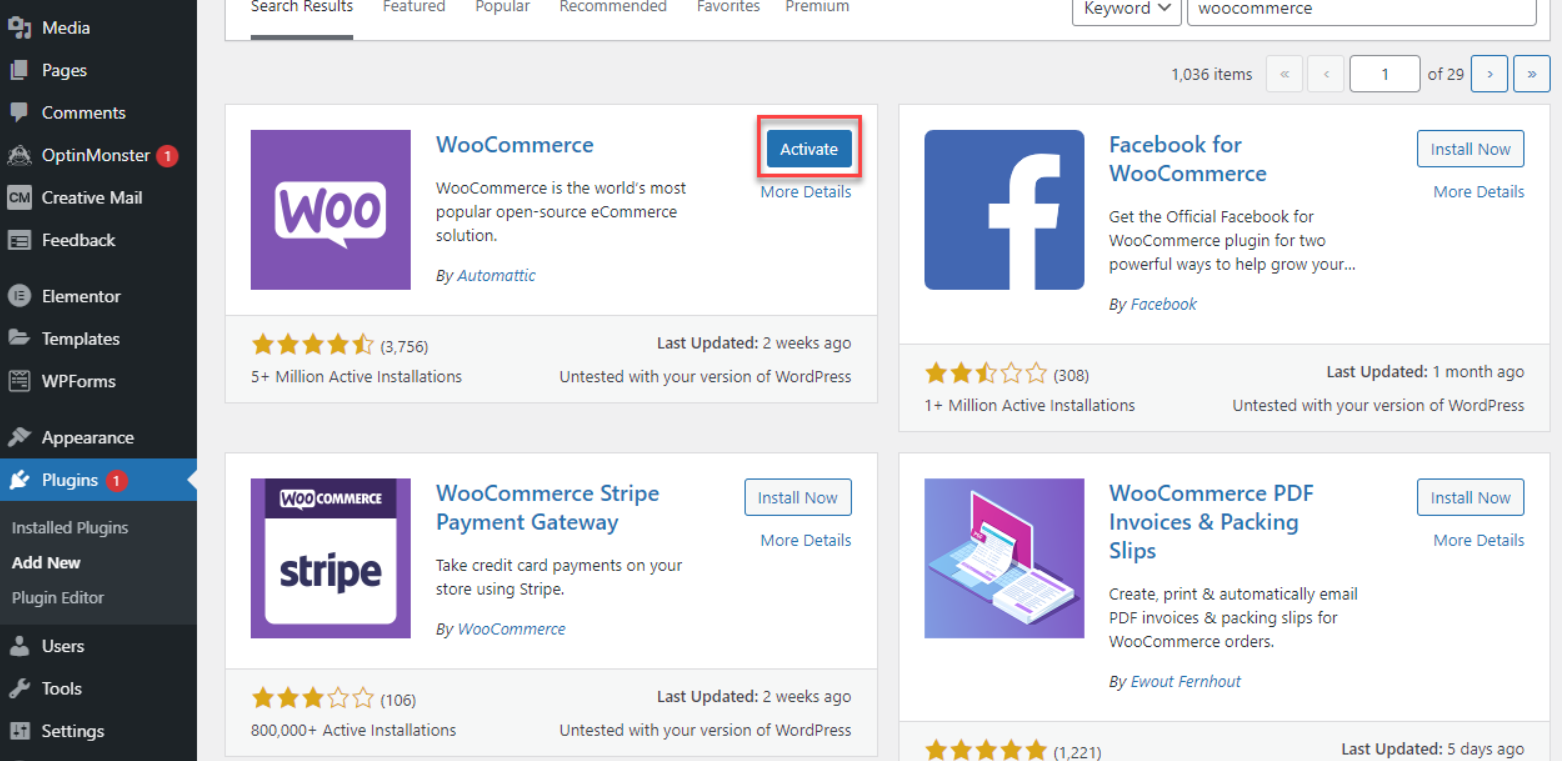
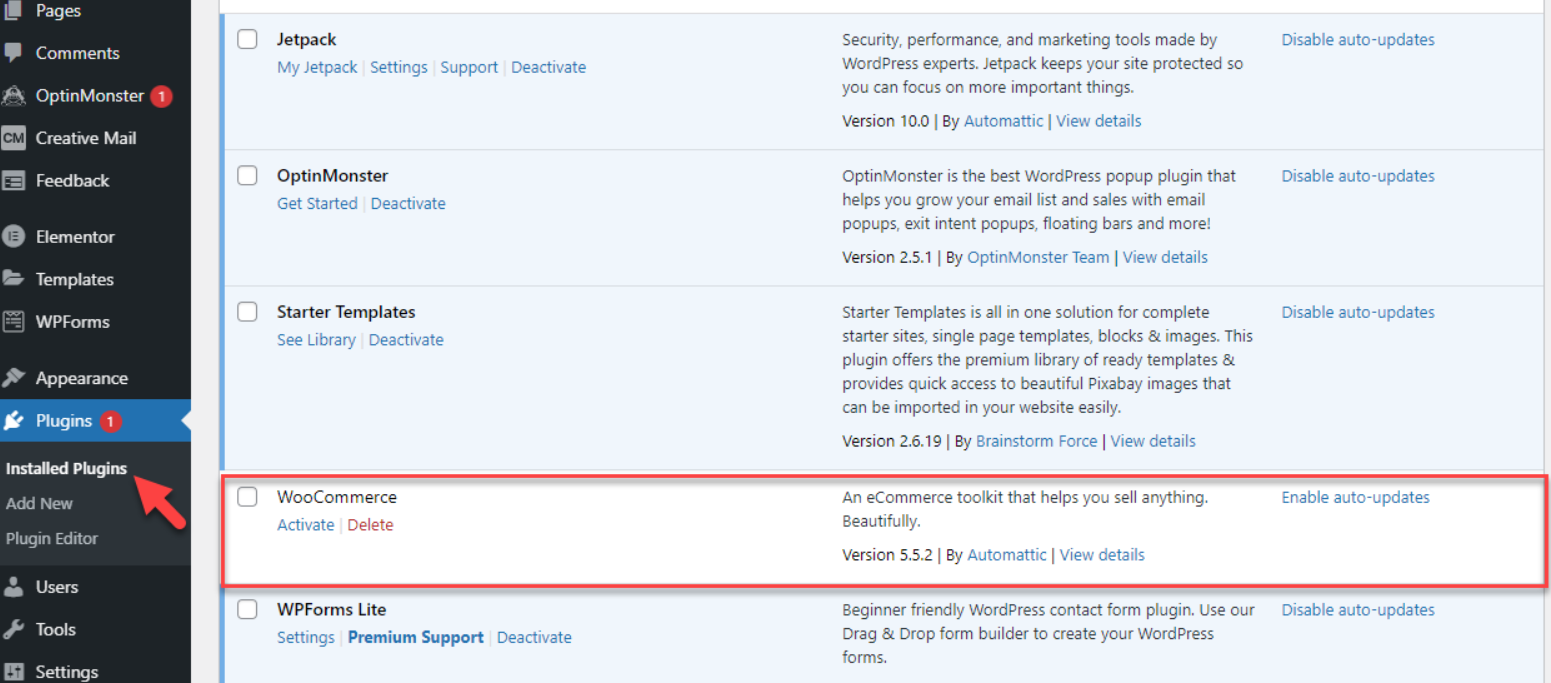
Your WordPress site is now equipped with the activated plugin, providing enhanced functionality. Explore the Plugins menu for further management options.
Essential Plugins to Elevate Your Food Blog
Imagine plugins as the kitchen gadgets of your website, each designed to enhance performance and user experience. Here's a breakdown of crucial plugin categories and their notable representatives:
-
SEO Plugins:
- Yoast SEO: A widely-used SEO plugin for optimizing content visibility on search engines.
- All in One SEO: A popular choice for millions of websites, offering decent SEO features.
- Rank Math: Another effective SEO plugin with built-in suggestions based on best practices.
-
Food-Related and Recipe Card Plugins:
- WP Recipe Maker: Introduces a user-friendly recipe card feature with options for nutrition facts, ingredients, and instructions.
- Recipe Maker from Zip Recipes: User-friendly plugin for creating recipe cards with an automatic nutrition generator.
- Nutrition Facts Label: Ideal for sharing nutritional information with your audience.
- WP Delicious (formerly Delicious Recipes): SEO-optimized plugin allowing food bloggers to create and display recipes.
- Food Menu for WooCommerce: Simple plugin for cafes, restaurants, and more, including WooCommerce ordering.
- Food Store - Online Food Delivery & Pickup: Transforms your restaurant into an instant food ordering hub.
-
eCommerce:
- WooCommerce: Turn your food blog into a store to monetize your content.
-
Social Sharing Plugins:
- Simple Social Icons: Enables easy content sharing across various social media platforms.
- Grow Social by Mediavin: Enhances social sharing with customizable buttons and Pinterest-specific features.
- Sumo: Provides easy-to-implement social sharing buttons with customization options and analytics for tracking social engagement.
Creating and Managing WordPress Blog Posts
Adding a Blog Post
- Log in to your WordPress Dashboard.
- Navigate to "Posts."
- Choose "Add New."
- Utilize the provided screen to craft your post.
-
Click "Publish" when your post is ready. It will then appear on your website's blogging page.

Changing Post Publication Location
- Log in to your WordPress Dashboard.
- Visit "Settings."
- Select "Reading."
-
Adjust or confirm the content displayed on your front page:
- Your Latest Posts: The default, showcasing blog posts on the home page.
- A Static Page: Substitutes your home (blog) page with a static page, displaying blog posts separately. Important: Avoid setting the 'home page' and 'posts page' as the same page, per WordPress requirements.
-
Save Changes.
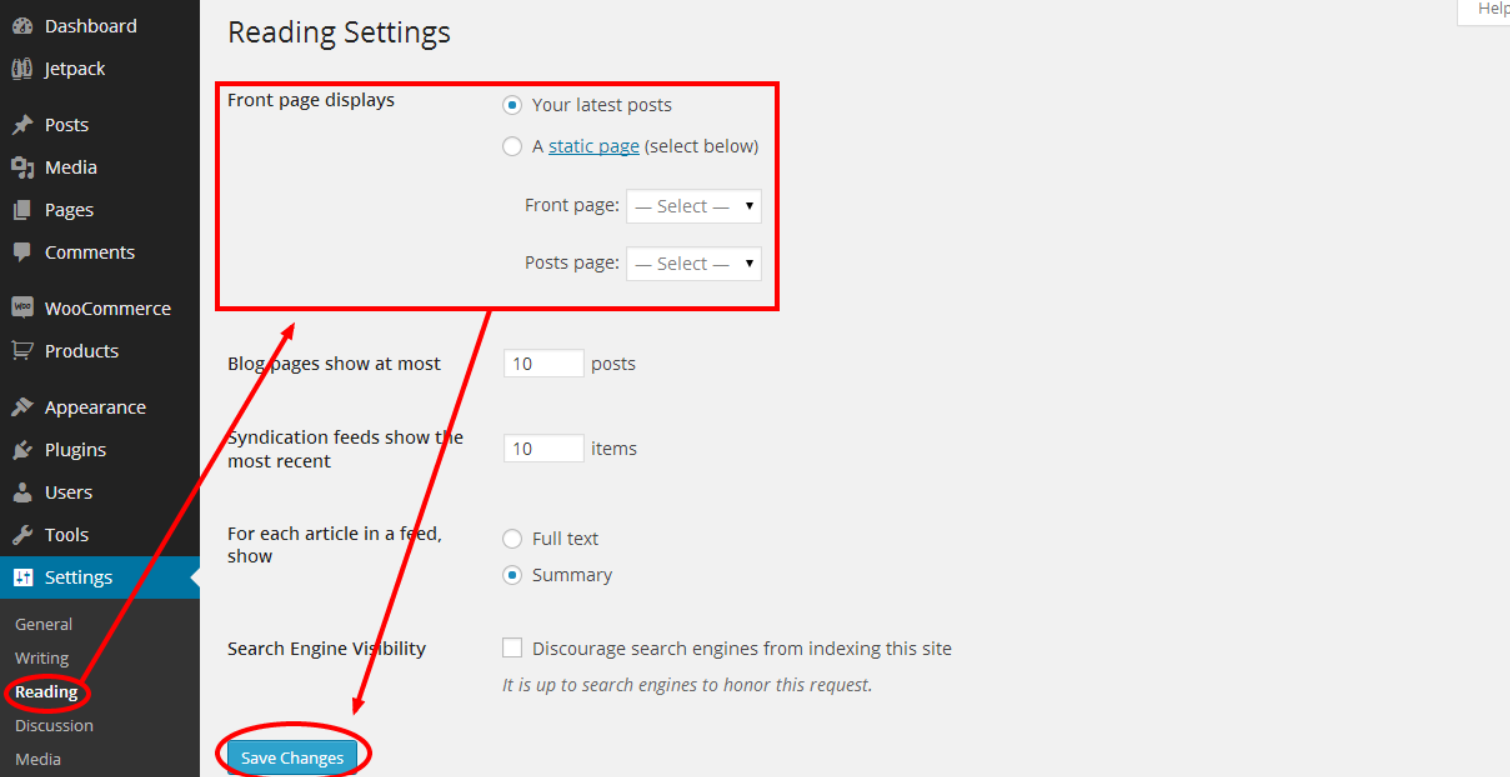
These simple steps empower you to effortlessly create and manage your WordPress blog posts, providing flexibility in their display locations.
Boosting Your Food Blog
Elevating your food blog's visibility involves employing diverse strategies. Here are impactful ways to promote your culinary content:
-
Establish Social Media Presence:
- Create dedicated Facebook, Instagram, and Twitter accounts for your blog.
- Regularly share updates, enticing photos, and blog links.
- Foster engagement by responding to comments and messages.
-
Implement SEO Tactics:
- Optimize your blog with relevant keywords in titles, headings, and content.
- Enhance search engine rankings to facilitate easier discovery.
-
Initiate an Email Newsletter:
- Utilize platforms like Mailchimp to craft newsletters.
- Notify subscribers promptly about new blog posts.
-
Collaborate with Fellow Bloggers:
- Reach out to other food bloggers for potential collaborations.
- Explore opportunities for cross-promotion on social media.
-
Partner with Food Services:
- Form partnerships with local restaurants, dine-in apps, and food delivery services.
- Provide reviews or exclusive discounts for your readers.
-
Leverage Paid Advertising:
- Consider paid advertising on platforms like Facebook Ads or Google AdWords.
- Extend your reach to a broader audience through targeted promotions.
-
Active Participation in Online Communities:
- Join and contribute to online food communities and forums.
- Engage in discussions related to your blog to connect with potential readers.
Remember, promoting your food blog is an ongoing process, and staying innovative will set you apart in the competitive culinary landscape.
Monetizing Your Culinary Platform
Turning your passion for food into a profitable venture involves exploring various avenues for income on your blog:
-
Affiliate Marketing:
- Generate income by endorsing products or services on your blog.
- Earn commissions for each sale or referral made through your unique affiliate links.
-
Displaying Ads:
- Monetize your blog by incorporating display ads.
- Join advertising networks like Google AdSense for automated ad placement and earnings per click.
-
Sponsored Posts:
- Secure revenue through sponsored posts for brands or companies.
- Craft content around a product or service in exchange for payment, ensuring transparency with readers.
-
Product Sales:
- If you offer distinctive food-related products or services (e.g., cookbooks or meal delivery), directly sell them on your blog.
-
Consulting or Coaching Services:
- Leverage your expertise in areas like recipe development or food photography.
- Offer consulting or coaching services to fellow bloggers or businesses seeking your specialized knowledge.
Monetizing your food blog is a dynamic journey, and exploring these avenues will not only generate income but also add value to your readership.
Ensuring Blog Stability: Backups and Security Essentials
Creating a secure and dependable digital space for your audience is crucial. Implementing regular backups functions as a safety mechanism, shielding your blog from potential data loss or technical hiccups.
Jetpack stands out as an excellent plugin option, offering automated daily backups and robust security features. Additionally, consider exploring other WordPress security measures to fortify your blog against potential threats and ensure a resilient online presence. Taking proactive steps in securing your platform guarantees a seamless and trustworthy experience for your readers.
Evaluating Your Food Blog's Effectiveness
Assessing your blog's performance is crucial for continual improvement. Focus on key metrics to gain insights:
-
Pageviews, Users, Sessions:
These metrics provide varied insights into visitor interactions.
- Pageviews: Total pages viewed on your blog.
- Users: Count of distinct individuals visiting your blog.
- Sessions: Overall visits to your blog.
- Bounce Rate: This indicates the percentage of visitors leaving your blog after viewing just one page, without further exploration.
Regularly monitoring these metrics helps gauge your food blog's effectiveness, guiding improvements for enhanced user engagement and satisfaction.
Success Stories: Real-Life Food Bloggers and Their Earnings
Several successful food bloggers have turned their passion into lucrative careers. " Pinch of Yum ," founded by Lindsay and Bjork, started as a hobby in 2010 and grew into a business earning over $90,000 a month, primarily from ads, sponsored content, and partnerships. " TiffyCooks ," run by Tiffy, generates $45,000 to $55,000 monthly, focusing on Asian recipes and quick dishes.
" A Sassy Spoon ," founded by Jamie in 2016, specializes in Cuban recipes, earning over $7,000 monthly through ads, freelance photography, sponsored content, and affiliate marketing.
Consider their stories an inspiration as you embark on your own food blogging adventure. Remember, the key ingredients are passion, creativity, and a dash of entrepreneurial spirit. Happy blogging


